I, like many, LOVE home assistant. It is getting better and better at making it easier to connect sensors, switches, lights and more to view as dashboard or create automations around the house.
One aspect I’ve really enjoyed is monitoring the temperature & humidity throughout my home (nerd I know!).
This article outlines how I set up a Bluetooth proxy using a Raspberry PI 3 to send Bluetooth sensors to Home Assistant, which were too far to connect directly.
Background - Reading the room
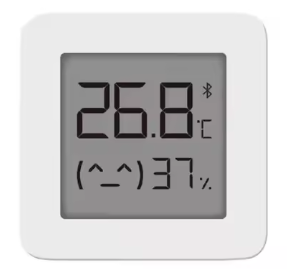
I first started with four of these Xaiomi Bluetooth Thermometers from AliExpress.
I needed to add a Bluetooth dongle to my home assistant computer and then all were found pretty easily.
As I started moving them around the house I found that the signal was getting troublesome and I’d find some in rooms farther away would drop off if, say, a door was closed between them.
I set up a Raspberry Pi 3 to act as a proxy which solved my problem.
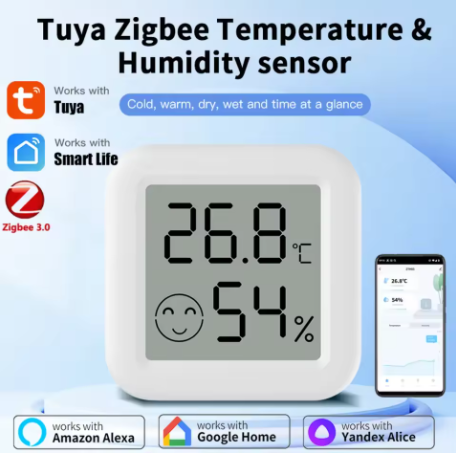
I’ve since added more thermometers, but have opted for the Tuya Zigbee versions as I have a decent mesh throughout the house with zigbee switches which makes it more stable.
Problem - moving time
All this was working well when I had my machine in the spare room. However we had a relative coming to stay for an extended period.
The machine that hosts home assistant is running on a custom home NAS and…well…it isn’t the quietest, disks randomly spin up and clunk throughout the night.
So it was time to move it to a different room. Once it was moved I realised several sensors were now in a dead spot like before.
I opted to set up another Raspberry Pi 3 that I had lying spare and this time, recorded the steps I took to get it working.
This article outlines the steps - in the hope it may be useful to others who want to set up similar.
What will it do?
We’re building a bluetooth proxy device using the Raspberry PI. I like these devices as they can be quite discrete and run silent. I will place it in the original location as the NAS before it was moved.
The Raspberry PI will listen to temperature and humidity readings broadcast by the smart thermometers using Bluetooth and then use MQTT message format to forward the events over WiFi to Home Assistant.
Once you have configured its pretty much set-and-forget.
What you’ll need
This project doesn’t require super fancy hardware. It won’t be doing much once configured:
- A Raspberry pi (I used a pi 3 model b).
- Bluetooth dongle (only if on a pi3 or older - newer models have built in I think) - again, I used an old Bluetooth 4.0 dongle lying around which was fine.
- Raspberry Pi Power supply - Use the offiical power bank is inexpensive and widely available. Other generic chargers I find can’t provide the right voltage, which causes problems for the Bluetooth adapter disconnecting. Using the official one makes it rock solid.
- An SD card - I had an 8GB lying around which was plenty. The final set up only used 3.5 GB. See Note: Undervolt Errors
Note: At the time of writing the latest model of the Raspberry Pi is a Pi 5, but depending on your budget you could get that or an older model. I think it could work as low as Pi 2.
In addition
You’ll also need these set up:
- Home Assistant - I’ve opted for the HAOS version, running on a VM on the NAS.
- An MQTT broker - like mosquitto running. I had this already set up on my Home Assistant OS instance already
The set up of these I won’t be going into detail on in this article. But let me know and I can write an additional one.
Step 1 - Install the OS
First thing to set up is the OS. There is a really helpful rapsberry pi imager tool you can use makes setting up really easy.
- Insert the microSD card into your computer.
- Download and install the imager tool
- Choose your model of Raspberry pi - in my instance the 3 model b.
- Choose your OS - for me I went with Ubuntu 20.04.5 64-bit as I’m familiar with it + it has Unattended Upgrades enabled by default which is nice. This guide will assume Ubuntu 20.04 is used.
- Choose the SD card from the list
- Click apply and now opt to apply customisations.
I like to set the following
- Under General
- Set hostname - something memorable for you
- Set username and password
- Set the wifi - to help connect more easily
- Set locale settings
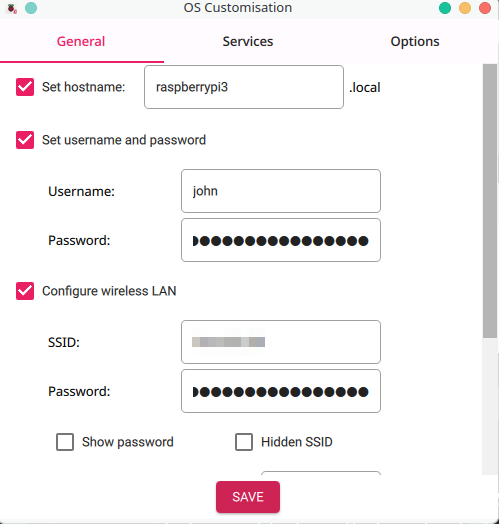
- Under Services
- Enable SSH
- Set preferred login method - I opted for passwordless and provided my public keys that are hosted on Github for reference.
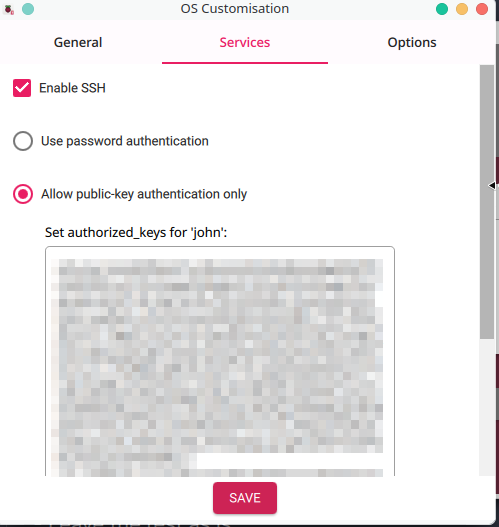
- Leave options as-is
- Under General
Then begin writing to the SD card.
Once done - eject and insert into your Raspberry pi.
Step 2 - Boot up the system
Now set up your device in the desired location. Insert:
- Power supply
- Bluetooth USB dongle
- Ethernet (optional - otherwise it will use the WiFI)
- HDMI (optional - can be handy to see initial messages for setup, then remove later)
Now power up the device. Wait a few minutes and then log in
ssh <username>@<hostname>.local
NOTE: I found the rasbperry pi 3 VERY SLOW to do any sort of updates etc. Might be the old SD card I’m using. Anyway once installed and running it shouldn’t matter.
Success! You should now be in. If that didn’t work - you may need to reboot the device to let it configure networking properly.
Step 3 - Configure the base system
The next steps is setting up a few base steps I like to do. For me, what I like as a minimum on my devices are:
- Firewall enabled and blocking by default - open necessary ports.
- Install & enable Tailscale and then allowing SSH only over the tailnet.
- Unattended upgrades - so that the machine continues to update itself without me having to do any work.
This all just adds a little extra security I like for these devices I leave running on their own.
Set up unattended upgrades and extended support
I opted for Ubuntu 20.04.5. I could have gone newer but had read that newer versions had more overhead which could make my system struggle. I also know 20.04 well so the setup quite familiar. Ubuntu 20.04 has a normal support window until April 2025, which at the time of writing only allowed for a couple of months of security updates.
Fortunately, you can get extended security maintenance to April 2032 using Ubuntu Pro - which is free for personal use, up to 5 devices.
So, onward with the setup.
Update package info sudo apt update
Automatic reboot for Unattended Upgrades
Unattended upgrades is enabled by default on Ubuntu. What we’ll need to do is enable automatic reboots to apply updates if needed.
Edit /etc/apt/apt.conf.d/50unattended-upgrades
And un-comment, set the following lines:
// Automatically reboot *WITHOUT CONFIRMATION* if
//  the file /var/run/reboot-required is found after the upgrade
Unattended-Upgrade::Automatic-Reboot "true";

// Automatically reboot even if there are users currently logged in
// when Unattended-Upgrade::Automatic-Reboot is set to true
Unattended-Upgrade::Automatic-Reboot-WithUsers "true";

// If automatic reboot is enabled and needed, reboot at the specific
// time instead of immediately
//  Default: "now"
Unattended-Upgrade::Automatic-Reboot-Time "02:00";
Now enable extended support.
- Sign up for Ubuntu Pro and log into the dashboard.
- In the dashboard find the token.
- In terminal
sudo pro attach <token>. - Then
sudo apt updateto update the package references.
Tailscale setup
Next is a personal preference of mine to set up Tailscale. This makes it easy to log in and monitor/diagnose anything wherever I am in the world. I like to combine this with the standard ufw firewall to lock down the ports and only allow ssh via my personal tailnet.
This means that my SSH port isn’t exposed and only people on my tailnet (me!) can reach SSH.
Its just an added security measure that gives peace of mind.
At the moment I’m also trialing having tailscale manage the SSH connection - so once I’m authenticated I can log straight in. Having tailscale take over the SSH also makes it a little smoother to connect without managing keys everywhere.
Install Tailscale (Instructions)
curl -fsSL https://tailscale.com/install.sh | sh
Enable tailscale and configure it to take over SSH authentication
sudo tailscale up --ssh
Check you can log in from another machine
ssh <user>@<tailscale-ip>
UFW - Close ports and only allow SSH via tailscale.
I followed these Instructions , to configure the default Uncomplicated Firewall (ufw) with the summary repeated here:
Reset ufw to its initial state (in case it was changed):
sudo ufw default deny incoming
sudo ufw default allow outgoing
Allow OpenSSH initially (we’ll disable again later)
sudo ufw allow OpenSSH
In addition, enable incoming connections to port 22 on Tailscale:
sudo ufw allow in on tailscale0 to any port 22
Once that’s done, enable UFW.
sudo ufw enable
Now login via tailscale
ssh <user>@<tailscale-ip>
Now that’s all working let’s go ahead and disable SSH via non-tailscale traffic. List the all rules, numbered.
sudo ufw status numbered
 Status: active

     To                         Action      From
     --                         ------      ----
 [ 1] 22 on tailscale0           ALLOW IN    Anywhere
 [ 2] OpenSSH                    ALLOW IN    Anywhere
 [ 3] 22 (v6) on tailscale0      ALLOW IN    Anywhere (v6)
 [ 4] OpenSSH (v6)               ALLOW IN    Anywhere (v6)
Remove the rules that say OpenSSH (or port 22 without “tailscale”)
sudo ufw delete 2
sudo ufw delete 4
Finally, reload UFW and SSH services.
sudo ufw reload
sudo service ssh restart
Done! You now have the device more secure and you have protected SSH port more with Tailscale.
Step 4 - Install Bluetooth sensors program
Now we’ve got the base running - it’s time to configure the device to listen for Bluetooth broadcasts and post onto an MQTT topic. Fortunately there is a helpful GitHub project already created by deepcoder (thanks!)
So lets get this configures
- Clone the repo. Run this in ssh on the Raspberry Pi
cd ~
git clone https://github.com/deepcoder/bluetooth-temperature-sensors
- Follow instructions fully in Readme. There is an important step to ensure you also install and build another git repo paho.mqtt.c
- Configure config
sudo cat /etc/ble_sensor_mqtt_pub.yaml- Set up MQTT location and username/pass
The last piece we’ll need to do is tell the program the devices we want to listen to. We’ll need to discover sensors first.
Discovering sensors
I used hcitool to scan and listen for devices publishing. I compared the reported temperature reading to ensure I got the right one.
Install hci tools
sudo apt install bluez
Scan for all
sudo hcitool -i hci0 lescan
To thin out - compare the temperature readout from the device screen to narrow down. You can thin the logs by filtering by MAC address:
sudo hcitool -i hci0 lescan | grep 7B:6F
I found sometimes I got an input/output error. Fixed with
sudo hciconfig hci0 reset
Once you’ve confirmed you have the MAC address for the right sensor, simply add as an entry under sensor: in the yaml config - again follow the example in the readme.
Here is my final config - with the MQTT details redacted
# config.yaml file for configuring blue tooth sensors

# MQTT server URL with port number
mqtt_server_url: "YOUR MOSQUITTO IP"

# MQTT base topic with a trailing slash
# for HA autoconfig to work this should be either "homeassistant/sensor/" or "homeassistant/sensor/[something]/"
mqtt_base_topic: "homeassistant/sensor/ble-temp/"

# set to empty if not used
mqtt_username: "YOUR MQTT USERNAME"
mqtt_password: "YOUR MQTT PASSWORD"

# bluetooth adapter = integer number of bluetooth devices, run hciconfig to see your adapters, 1st adapter is referenced as 0 in this program

bluetooth_adapter: 0

# scan type = 0 for passive, 1 for active advertising scan, some BLE sensors only share data on type 4 response active advertising packets
scan_type: 1

# integer number that is multiplied by 0.625 to set advertising scanning window in milliseconds. Try 100 to start.
scan_window: 100

# integer number that is multiplied by 0.625 to set advertising scanning interval in milliseconds. Try 1000 to start.
scan_interval: 1000

# 0 to publish via legecy style (by MAC directly into base), 1 to publish new style (by unique id into 'state').  Must be 1 for auto_configure to work.
publish_type: 1

# create HomeAssistant autoconfiguration entries, 1 to enable, 0 to disable
auto_configure: 1

# Create Sesnor for hourly statistics in Home Assitant if auto_confiutgure is enabled, 1 to enable, 0 to disable
auto_conf_stats: 1

# Create temp sensor in C in Home Assitant if auto_confiutgure is enabled, 1 to enable, 0 to disable
# Note that HA will convert this to F if your settings are for F
#   will be created as [name]-T
auto_conf_tempc: 1

# Create temp sensor in F in Home Assitant if auto_confiutgure is enabled, 1 to enable, 0 to disable
#   will be created as [name]-F
auto_conf_tempf: 1

# Create hummity sensor in Home Assitant if auto_confiutgure is enabled, 1 to enable, 0 to disable
#   will be created as [name]-H
auto_conf_hum: 1

# Create battery percentage sensors in Home Assitant if auto_confiutgure is enabled, 1 to enable, 0 to disable
#   will be created as [name]-B
auto_conf_battery: 1

# Create battery voltage sensors in Home Assitant if auto_confiutgure is enabled, 1 to enable, 0 to disable
#   will be created as [name]-V
auto_conf_voltage: 1

# Create signal strength sensors in Home Assitant if auto_confiutgure is enabled, 1 to enable, 0 to disable
#   will be created as [name]-S
auto_conf_signal: 1

# not implemented yet
#syslog_address: "IP FOR SYSLOG IF YOU PREFER"

# set log level
# 0 = LOG_EMERG - system is unusable
# 1 = LOG_ALERT - action must be taken immediately
# 2 = LOG_CRIT - critical conditions
# 3 = LOG_ERR - error conditions
# 4 = LOG_WARNING - warning conditions
# 5 = LOG_NOTICE - normal but significant condition
# 6 = LOG_INFO - informational
# 7 = LOG_DEBUG - debug-level messages

logging_level: "7"

#### config for each sensor

# Name: when auto configure is used thie will be the Name of the device, the root of the Friendly Name, as well as the basis HA uses for creating the entity name
# Unique: name used for topic publishing and used as unique ID for HA auto config - no spaces or odd characters allowed
# Location: used with HA auto config to auto assign sensors to a specific area
# Types:
#   1 = Xiaomi LYWSD03MMC-ATC   https://github.com/atc1441/ATC_MiThermometer
#   2 = Govee H5052 (type 4 advertising packets)
#   3 = Govee H5072
#   4 = Govee H5102
#   5 = Govee H5075
#   6 = Govee H5074 (type 4 advertising packets)
#  99 = Display raw type 0 and type 4 advertising packets for this BLE MAC address
# MAC: the MAC address of the sensor

sensors:
  - name: "Laundry Sensor 7B6F"
    unique: "th_laundy_room"
    location: "Laundry Room"
    type: 1
    mac: "A4:C1:38:FE:7B:6F"
  - name: "Back Room Sensor A7FC"
    unique: "th_back_room"
    location: "Back Room"
    type: 1
    mac: "A4:C1:38:5F:A7:FC"
Restart the program with
systemctl restart ble_sensor_mqtt_pub
You can monitor whether you have readings coming in with
sudo journalctl -f
Step 5 - Configure the Bluetooth Thermometers for correct reading
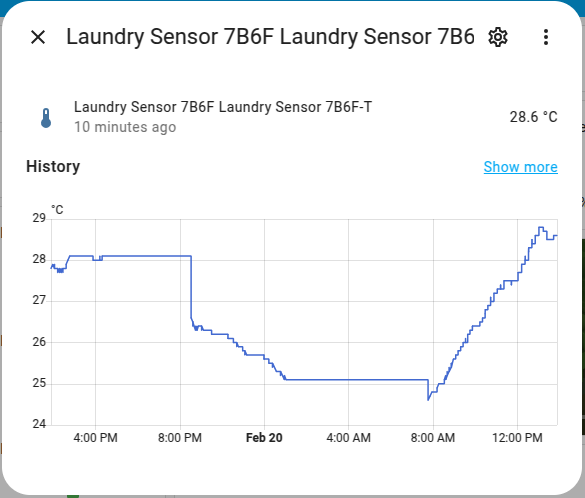
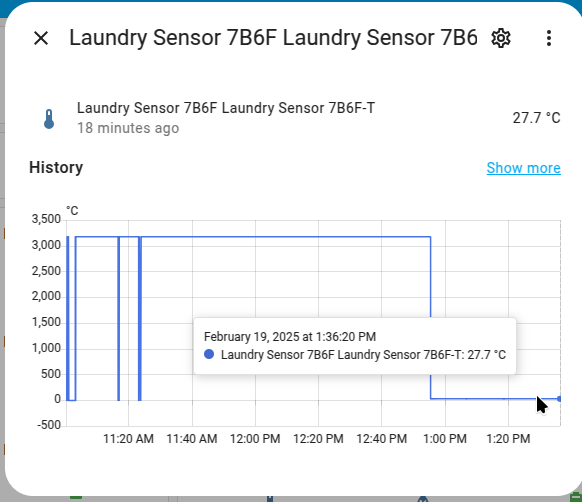
Once I started getting readings, I found that it wasn’t reading correctly. For example, on one sensor the readings were jumping from -3.9C to 3,000C.
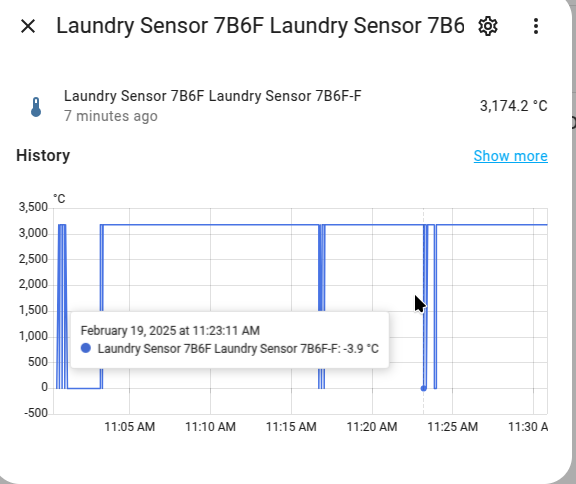
I saw an issue in the repo which reminded that these Xaiomi devices need the config reflashing. Its pretty straightfoward using an online tool.
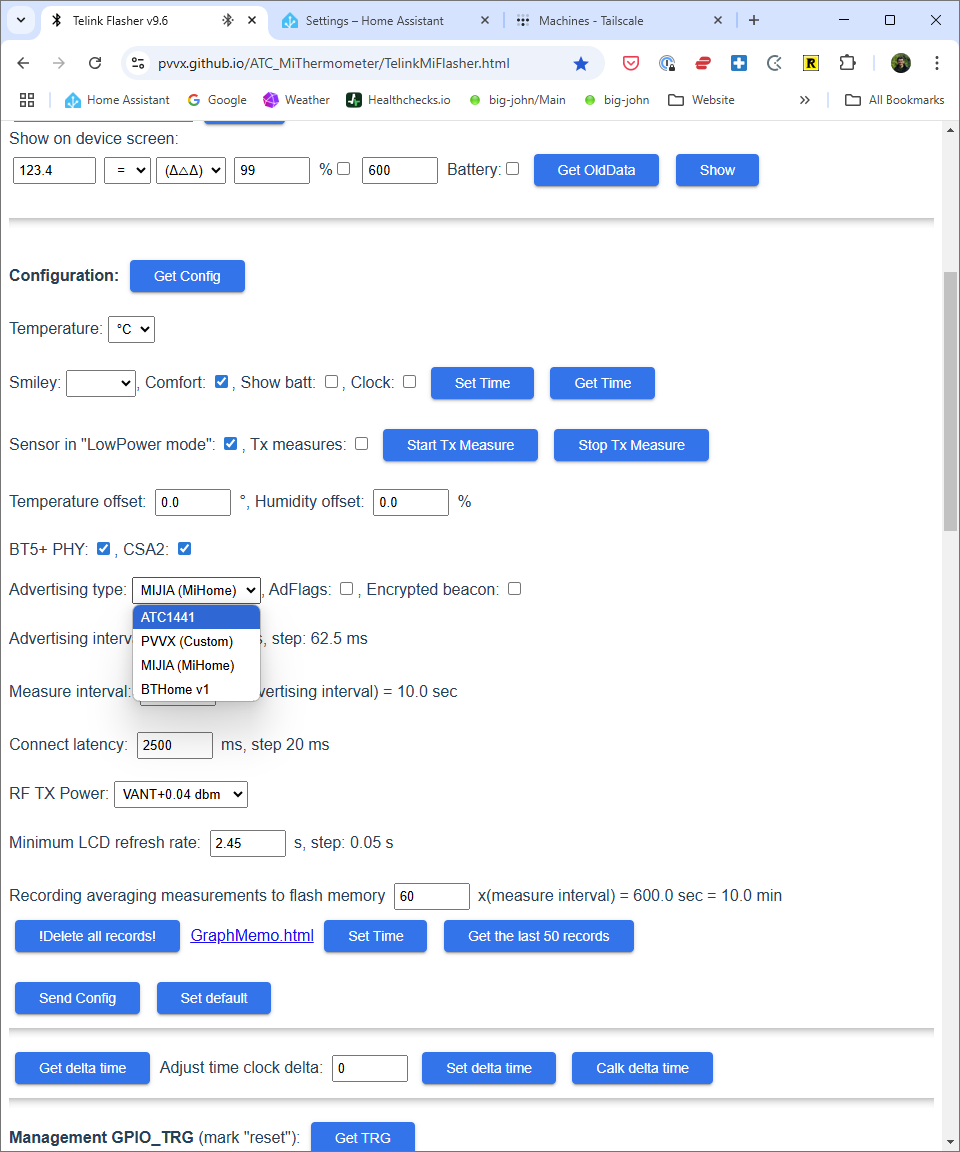
The issue is due to the devices configured to advertise as MIHome, and we need to change to ATC1441 which the program can recognise and parse correctly.
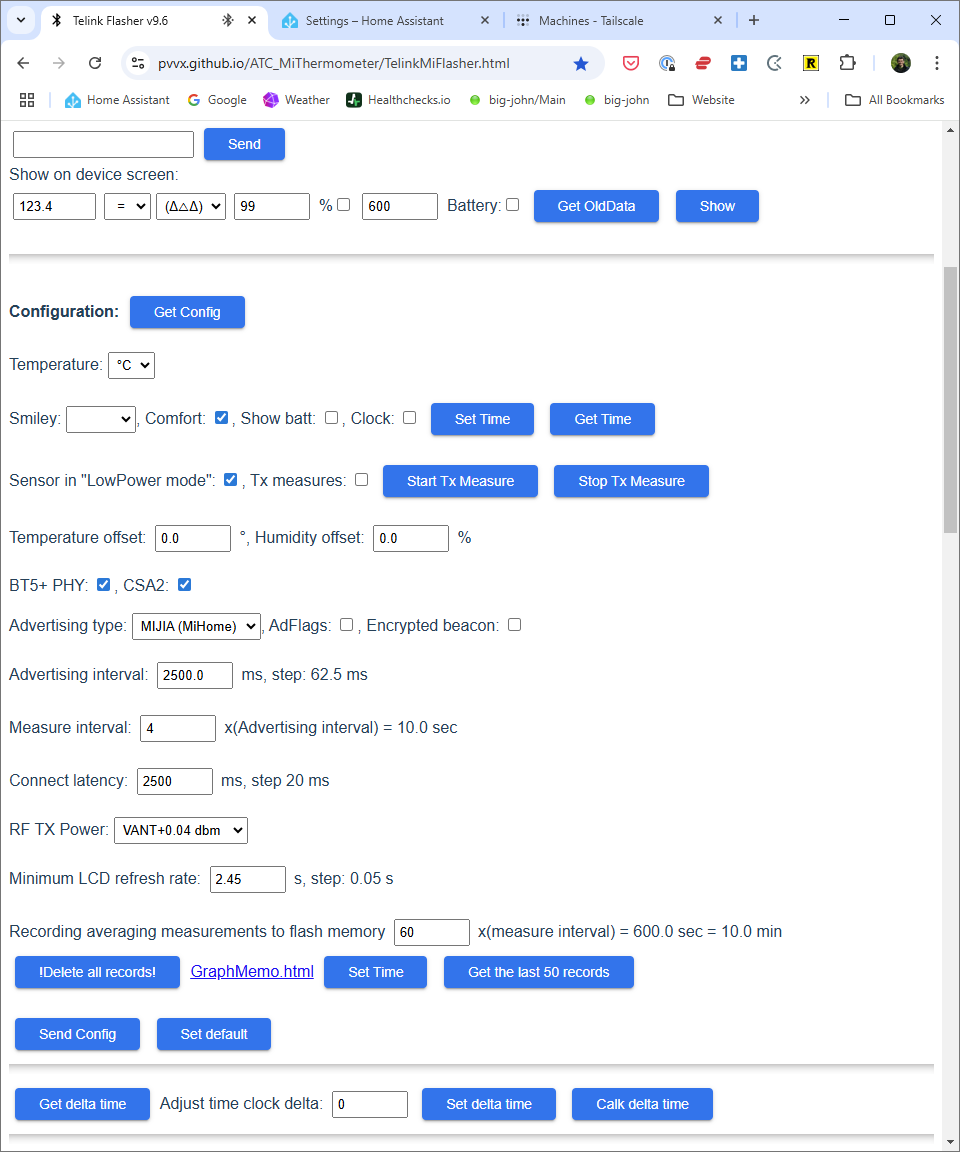
Flash with Telink flasher
Note: I found this worked better using Chrome on Windows for some reason. Running this on Linux I found there were issues connecting and maintaining the connection to the bluetooth device.
Bring your smart themometer close to your laptop.
- Open this Telink Flasher tool.
- Connect and look for the device in the popup - in my example I’m looking for the last segments of the MAC address 7B6F.
- Once connected Get Config.
- Then change the advertising type from MIJA to ATC1441. This is the critical change.
- Press Send config to flash back
After this change, I saw the readings stabilise and come through correctly.
Note: Undervolt errors
I originally had undervolt errors due to an inadequate charger meant that the Bluetooth device kept failing. It would go offline for hours until I restarted unit.
This was resolved by purchasing and using the Raspberry Pi Power supply.